Soil is Beautiful
Building Healthy Raised Beds
Through the Seasons
Healthy soil isn’t something I rush. It’s built slowly, layer by layer, season by season. Instead of stripping beds bare and starting over every spring, I focus on returning organic matter to the soil and letting time, weather, and microbes do most of the work.
This is the exact process I use to prepare my raised beds from late fall through early spring.
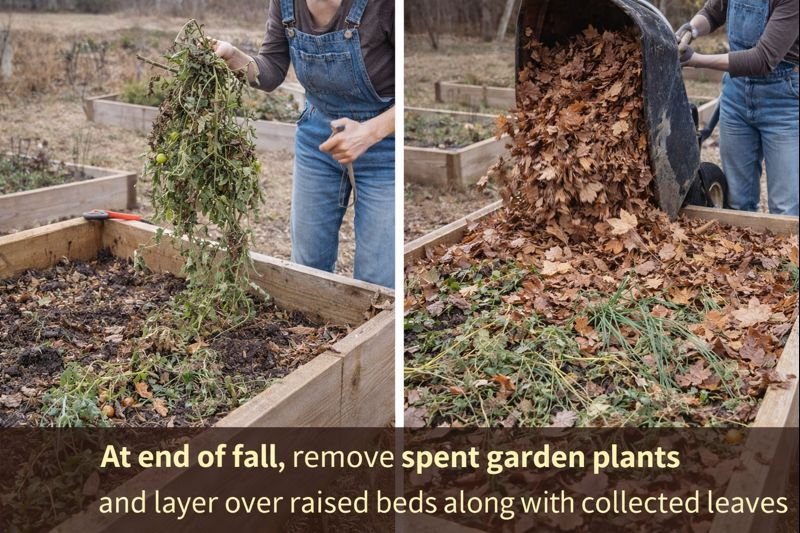
Step 1: Remove Spent, Non-Producing Plants
At the end of the growing season, I pull out plants that are finished producing. These are healthy plants that have simply reached the end of their life cycle—not plants with disease or pest issues.
I cut them up into smaller pieces so they’re easier to distribute evenly across all my beds. Breaking them down helps them decompose faster and makes sure every bed gets a share of the organic material.
Step 2: Collect Clean, Untreated Leaves
Leaves are one of the most valuable free resources for the garden. I collect leaves whenever possible, making sure they come from trusted sources with no fertilizers or pesticides.
These leaves act as both insulation and food for the soil, helping protect beds through winter while slowly breaking down.
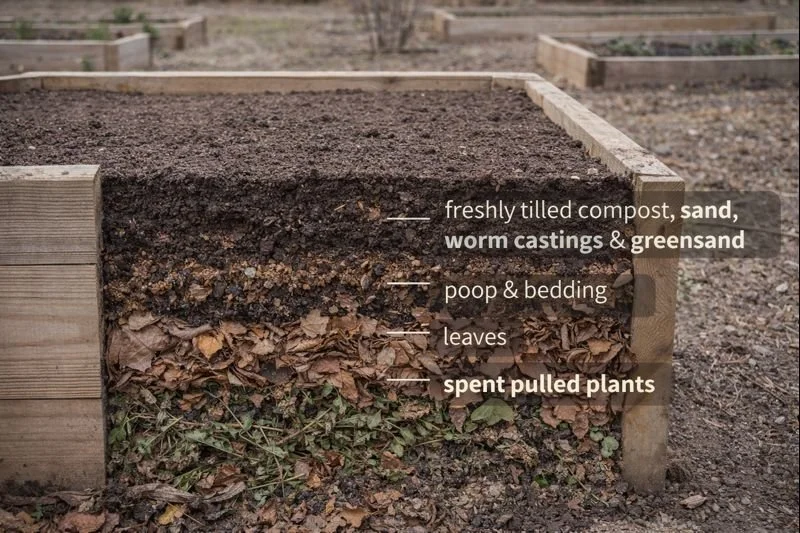
Step 3: Layer Spent Plants Into Each Bed
I place the chopped plant material directly on top of the soil in each raised bed. Some years it’s a thin layer, other years it’s thicker—whatever the garden gives me.
This isn’t about perfection. It’s about returning organic matter back to the soil instead of removing it.
Step 4: Cover With Leaves
Once the plant material is down, I cover it with a layer of leaves. This helps hold everything in place, protects the soil surface, and creates a blanket that feeds microbes as it breaks down.
This layering method mimics what happens naturally on a forest floor.
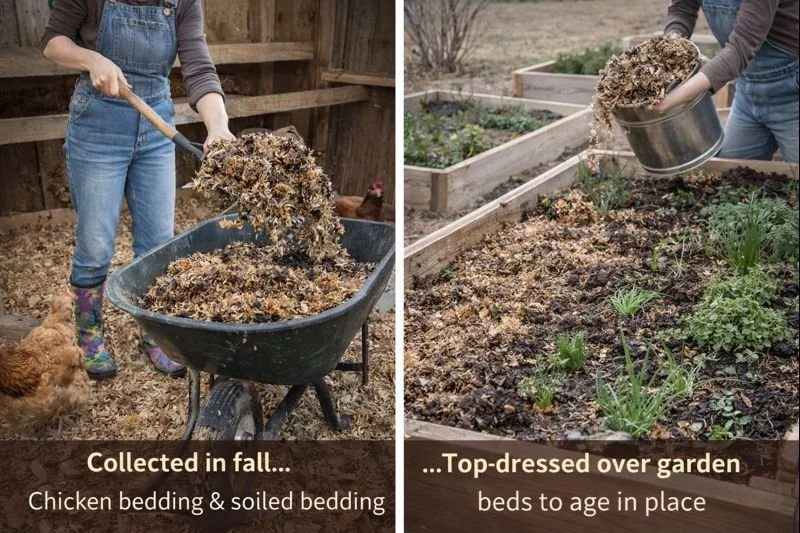
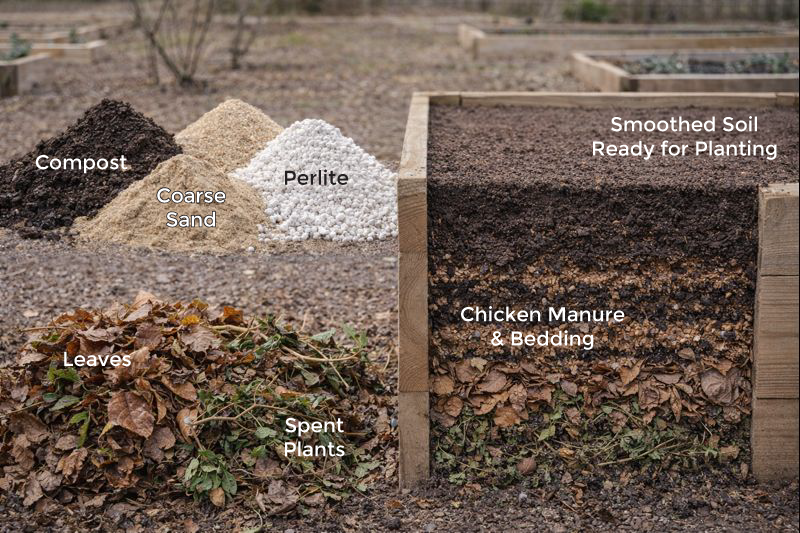
Step 5: Collect Chicken Manure & Bedding
Throughout fall and winter, I collect chicken manure and soiled bedding from the coop. This bedding usually includes straw or shavings mixed with manure.
Chicken manure is strong, which is why timing matters.
Step 6: Top-Dress Beds Throughout
Fall & Winter
Instead of adding everything at once, I distribute the chicken bedding over the beds gradually through fall and winter. It goes on top of the plant and leaf layers, not mixed in.
Rain, snow, and time help mellow the nutrients naturally, making them safe and usable by spring.
This method is especially helpful for beds where I leave plants overwintering, including: When the weather warms and temperatures stay consistently in the 55’s during the day, I remove the mulch and have beautifully fertilized soil. You can add this mulch to your compost pile or save it in a bin to use again for summer time mulching.
Garlic
Flower bulbs
Green onions
Chives
Parsley
Thyme
Oregano
Strawberries
The bedding layer protects these plants from harsh weather while slowly fertilizing the soil beneath.
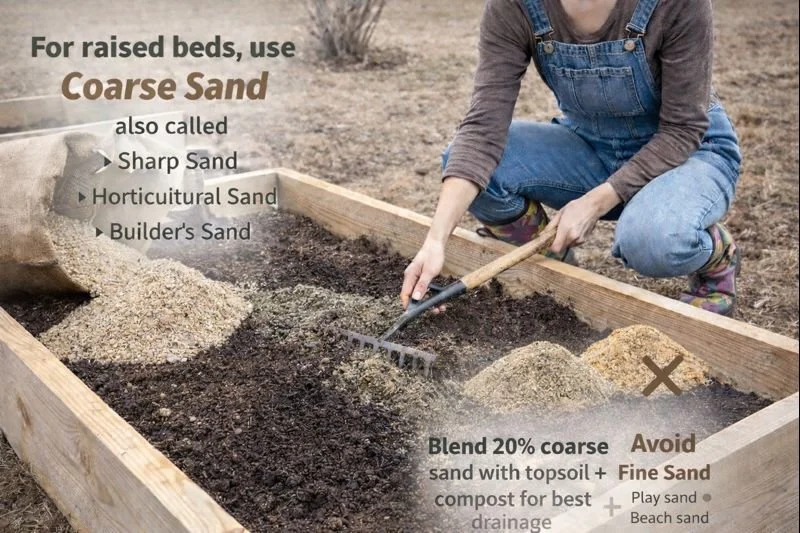
Step 7: Early Spring Soil Refresh (3-2-1 Blend)
When spring arrives, I refresh the beds using a simple 3-2-1 ratio:
3 parts compost (I’m lucky to get this free locally)
2 parts coarse sand – you can find this at your local nursery or rock & dirt supplier or a local hardware store. Not play or beach sand
1 part perlite (if needed) - mainly for brand new raised garden beds
This blend improves structure, drainage, and airflow while maintaining moisture balance.
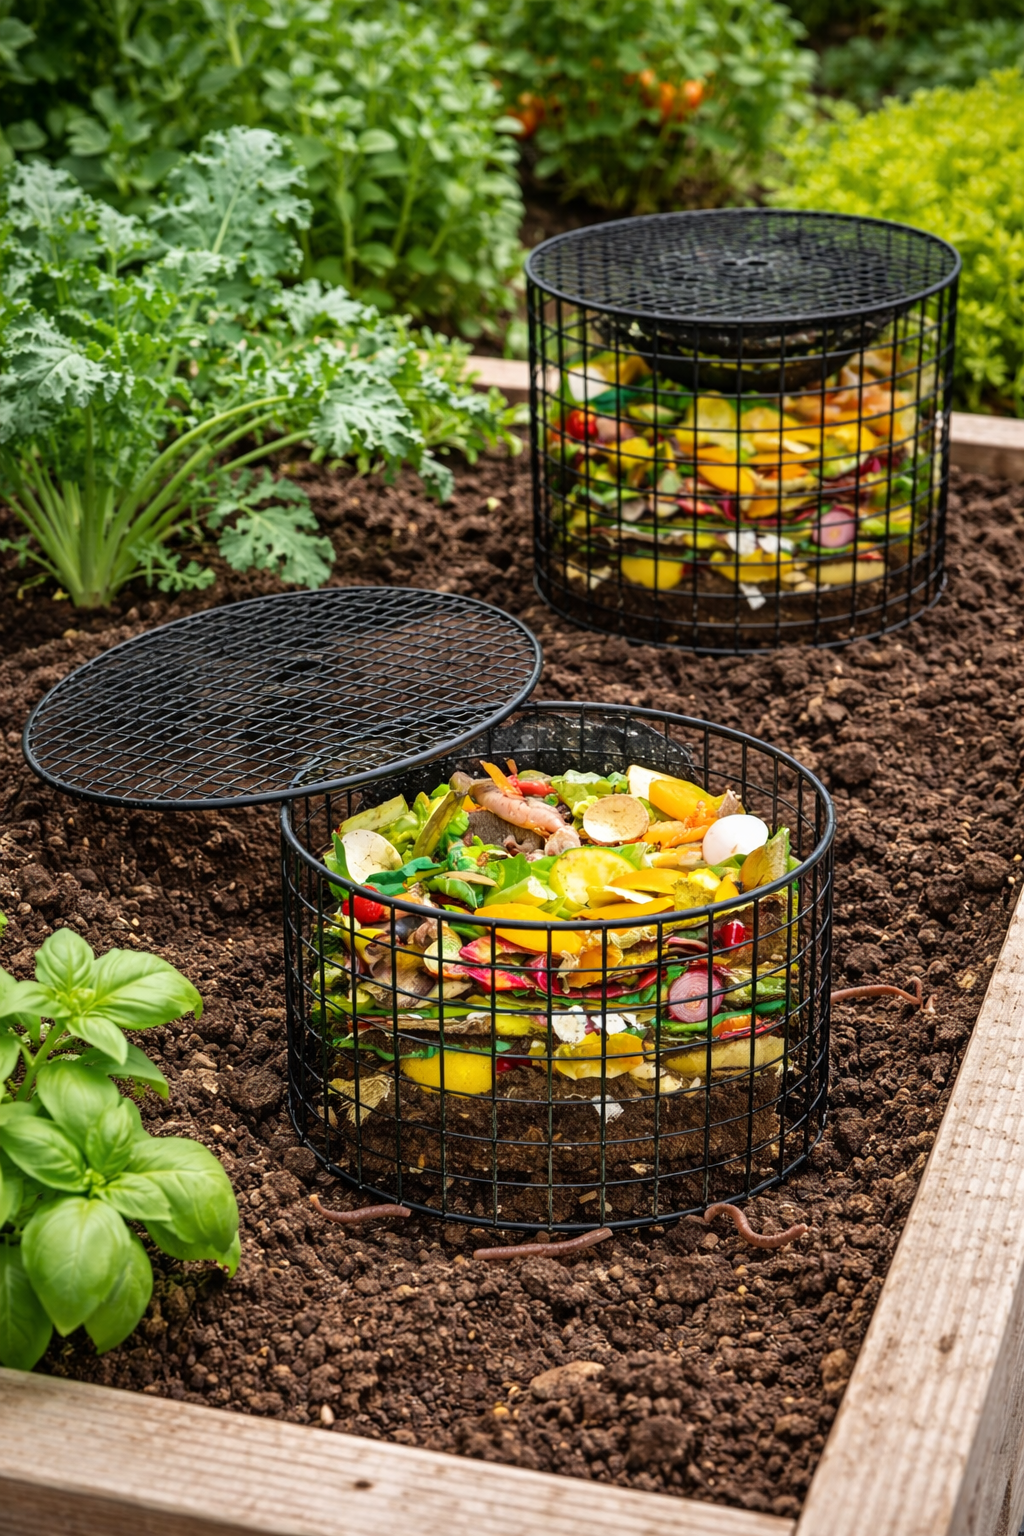
In-Ground Worm Composting
In-ground worm composting bins make it easy to recycle kitchen scraps directly into your garden soil. These metal bins sit right in the bed, allowing worms to break down food waste naturally while distributing nutrients into the surrounding soil. It’s a simple, low-effort way to improve soil health, reduce waste, and create rich organic matter exactly where your plants need it most.
You can place these bins in the soil in the early spring, when soil is workable. Make sure the bins are under the soil.
To Start your composting process let’s start here:
Fill a small amount of shredded cardboard in the bottom.
Add some dried leaves.
Fruit & veggie scraps.
Eggs shells - no need to dry them.
Small amounts of grass clippings can be added.
Some of the top soil can be pushed into the bin to cover up the scraps to keep critters from steal your scraps.
Link below to my shop page to purchase this bin.
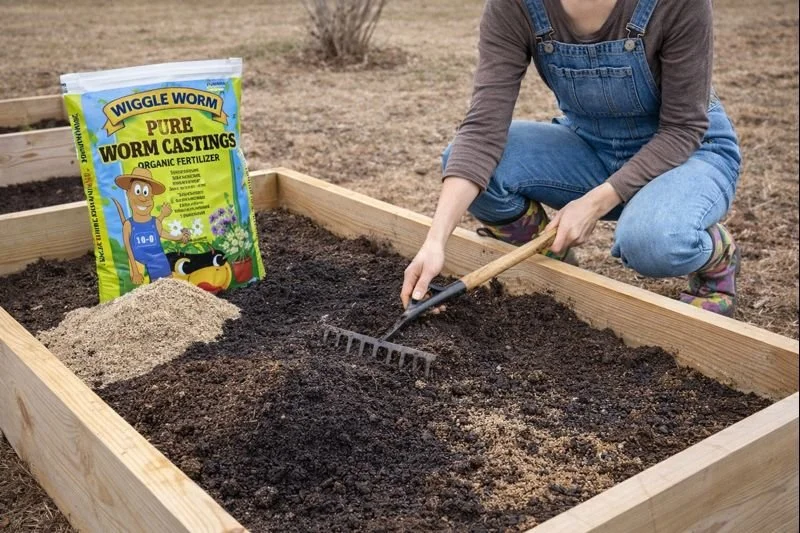
Step 8: Add Worm Castings
Next, I add worm castings according to the directions on the bag. Worm castings gently feed the soil, support microbial life, and improve nutrient availability without overwhelming plants.
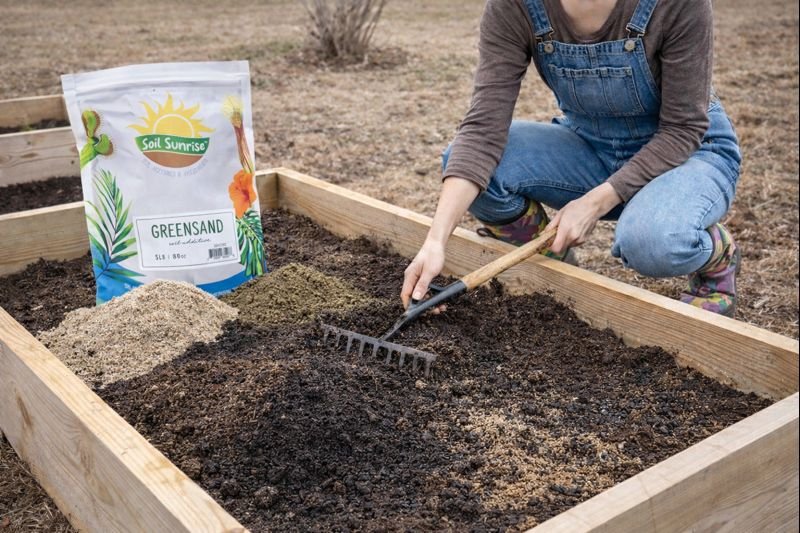
Step 9: Add Greensand
Greensand is added according to package directions. It provides slow-release potassium and trace minerals, supporting long-term soil health rather than quick growth.
Step 10: Till the Bed
Once everything is added, I till the entire bed using an auger drill bit attached to my drill. This mixes all the layers evenly while keeping the process efficient and easy on my body.
Step 11: Water Thoroughly -
or Let the Rain Do It
After tilling, I give the bed a good watering or let it sit through a couple of good rain showers. Sometimes our irrigation isn’t running yet when I start this process, so I work with what nature provides.
Moisture helps activate microbes and begin the soil-settling process.
Step 12: Level & Let the Soil Rest
Finally, I level the bed and let it settle for about one week before planting. This resting period allows everything to integrate and prevents plants from sinking or shifting later.
A Final Thought
Soil doesn’t need to be forced—it needs to be cared for. By layering organic materials, respecting seasonal timing, and letting nature do its work, I end up with healthier soil and stronger plants every year.
Soil really is beautiful when you give it the time it deserves.

Healthy soil is the foundation of everything you plant.
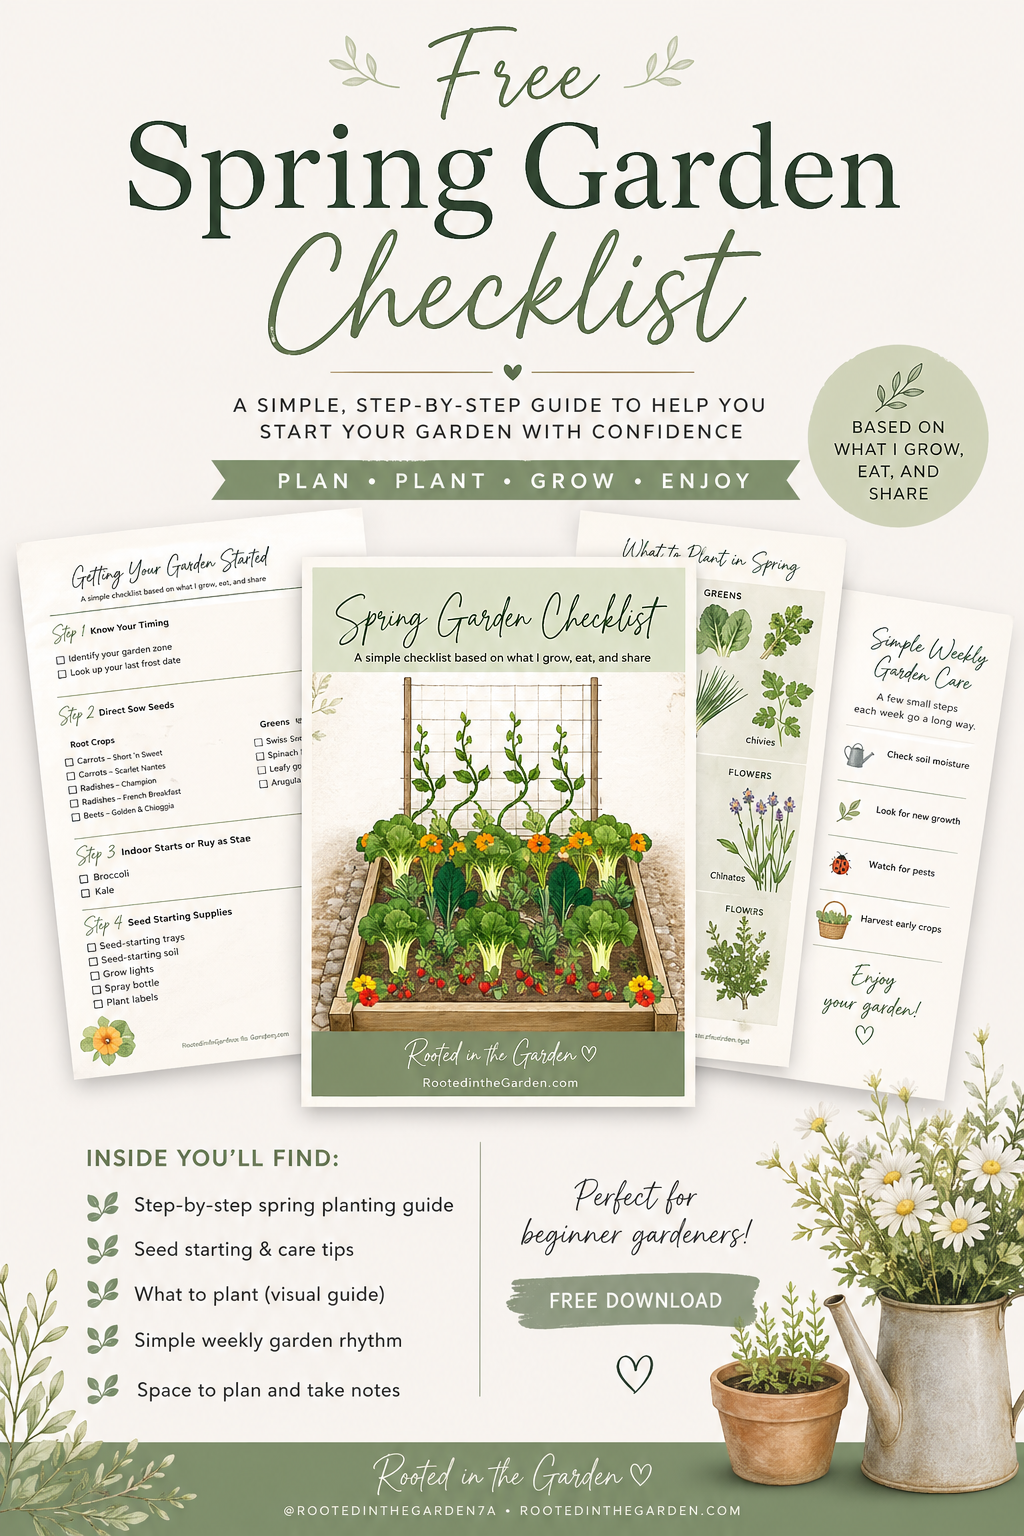
If you’re planning your spring garden, I created a simple checklist to help you stay organized 🌱
Download the Free Printable